Posts

Showing posts with the label blog tutorial

Comm100 Live Chat Review, service and communication

Image
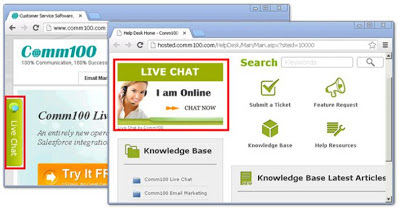
Customized Experience, Consolidated Management For some businesses or organizations, different parts of their website may require different live chat experiences. For instance, the live chat style can vary a lot for the home page, the product pages, and the support center. With Comm100 Live Chat , users can set up as many live chat plans as they want and fully customize them to match different parts of their website or even multiple websites while managing all the visitors, chats and reports within one account. Customizable items in each live chat plan include chat button, chat window, chat invitation, pre-chat survey, post-chat rating and some other chat settings. All of the items can be freely tailored to users' business needs. Take the pre-chat survey for example. Users can choose to either enable or disable it and if they have it enabled, they can give it a new title and branding image, change the greeting message and configure the fields to be displayed. By using multiple live

3 Ways Chatwing Chatroom App Eases Information Relay in Any Website

Image
Information is one of the prime ways why people are creating and visiting websites regularly. In fact, websites fall in thousands of niches each having variations in popularity and purposes. With this important fact, it is right to state that information is crucial to all types of online transactions. If you are considering building a website, bear in mind that you have to speed up any means of information relay. Luckily, as a website owner, you can utilize a chatroom application that can help you achieve your online goals. This chatroom application is provided by Chatwing.com , a company that excels in connecting people from different parts of the world. Listed below are the important ways the Chatwing chatroom can ease up any information relay process. Diverse Chatroom for Everybody Installing the Chatwing chat box for any website can guarantee streams of traffic daily. Of course, this depends on the overall content of the website and the niche being discussed. Niche popularit

Numbered Page Navigation For Blogger a Simple Step

Image
Page Navigation facilitates visitors to explore our blog and view page per page. Blogger did not facilitate page navigation. Page Navigation is a really awesome and long awaited feature. Muhammad Rias of Techie Blogger had already developed a page navigation system for blogger.It really was an awesome trick which was made at a time when nobody could even think of implementing it on blogger.It had some minor bugs and now Abu Farhan has perfected it and he has now given us the perfect page navigation solution. For WordPress users must already be familiar with page navigation. For Blogger users let's do this. Here are the steps: 1.Login to Blogger Dashboard and navigate to Layout > Edit Html 2. Checkbox which says ' Expand Widget Templates ' 3. Now find ]]></b:skin> and replace it with .showpageArea { padding:10px; } .showpageArea a { text-decoration:underline; } .showpageNum a { text-decoration:none; border: 1px solid #ccc; margin:0 5px; padd

How to find Blogger's blog ID number?

Image
Sign into Blogger. In the list of blogs, tick on the blog which ID number you want ( see screen shot below ): Look at the address bar with the blog URL at the top of the browser and you will see ID=1234567891011121314 as highlighted in blue in the screen shot below: Those numbers are your blog ID number

How to change maximum number of posts in Blogger label page

Image
Blogger has set a default maximum 20 blog posts in its label page (category page). This may or may not suit your preference or your purpose in setting up the label page. You may want to decrease it to increase download time. Alternatively, you may want to increase the maximum number of posts to show all posts with the same label (category). If you want to change this default maximum number of post, you will have to edit the template. First, backup your blog template ( Dashboard > Template > Backup (at the top right corner) > Download full template > All files) Now you got to open the template editor ( Dashboard > Template > Edit HTML ). Tick [ ] Expand Widget Templates Now use ctrl+F to help you find the following codes: expr:href='data:label.url' Replace the above with the following (I used the number 150 because I want all posts to be displayed in the label page. You may use other numbers in place of 150): expr:href='data:label.url +